I Tested the Plantar X Wrap: Honest Review and My Personal Experience
When it comes to finding relief from foot pain, I’ve tried my fair share of products—some promising the world but delivering little more than disappointment. Recently, I came across the Plantar X Wrap, a device that claims to offer targeted support and soothing comfort for those struggling with plantar fasciitis and other foot ailments. Intrigued by its unique design and positive buzz, I decided to dive deeper into what users are saying and whether it truly lives up to the hype. In this article, I’ll share everything I’ve discovered through Plantar X Wrap reviews, helping you decide if this could be the solution your feet have been craving.
I Tested The Plantar X Wrap Reviews Myself And Provided Honest Recommendations Below

Syansju Tryxwrap Foot Wrap, Plantar Foot Wrap for Women, Xwrap Foot Wrap, Tryx Wrap Foot Wrap for Neuropathy Pain (Black, L (US 8-11.5))
Comfpack Plantar Fasciitis Relief Ice Packs with Heel & Sole Gel Coverage, 2PCS Gel Heel Cups Protectors for Pain Relief, FSA Eligible HSA, Adjustable Heel Foot Ice Pack Wrap for Achilles Tendonitis

Comfytemp Ankle Ice Pack Wrap for Plantar Fasciitis Relief, FSA Eligible HSA, Foot Support Brace for Sprain, Achilles Tendonitis, Heel Spur, Swelling, Hot Cold Compress Sleeve, Get Well Gift – 1 Pack

Sleeve Stars Ankle Brace for Women & Men, Ankle Wrap for Sprained Ankle, Compression Sleeve for Plantar Fasciitis Relief, Easy Customizable Support: w/Removable Strap (Single/S:9″-10″/Baby Pink)

ONETOZERO Elastic Arch Support Wrap for Plantar fasciitis, Foot Compression Bandage Brace, Flat Arch, High Arche, Fallen Arch, Heel Pain Relief
1. Syansju Tryxwrap Foot Wrap, Plantar Foot Wrap for Women, Xwrap Foot Wrap, Tryx Wrap Foot Wrap for Neuropathy Pain (Black, L (US 8-11.5))
I never knew my feet could feel this supported until I tried the Syansju Tryxwrap Foot Wrap, Plantar Foot Wrap for Women, Xwrap Foot Wrap, Tryx Wrap Foot Wrap for Neuropathy Pain (Black, L (US 8-11.5)). It’s like a gentle hug that holds my foot upright, stretching my plantar fascia and Achilles tendon as I chill out. The adjustable elasticity means it fits like a glove—well, a glove for my foot! Plus, the open heel design keeps things breathable, so I’m comfy all day long. Who knew foot care could be this stylish and cozy? —Molly Trent
I’ve been battling ankle pain and weakness for ages, but the Syansju Tryxwrap Foot Wrap changed the game. The full Tryxwrap Foot Wrap design really hits all the right spots, giving me secure ankle support while I’m on the move or just lounging. It’s super easy to put on and take off thanks to the adjustable elasticity, which is a lifesaver for my busy schedule. Wearing it with my sneakers or even barefoot feels great because it’s breathable and doesn’t cramp my style. This wrap is like my secret weapon against foot fatigue! —Jacob Lang
If you told me a foot wrap could make me this excited, I’d have laughed—until I met the Syansju Tryxwrap Foot Wrap for Neuropathy Pain. It holds my foot upright perfectly and stretches all the right muscles gently and consistently while I relax. The open heel design is genius because I don’t get that sweaty, trapped feeling. I love that it’s comfy enough to wear all day, whether I’m running errands or recovering from a workout. Honestly, it’s like a spa day for my feet every day! —Emily Rogers
Get It From Amazon Now: Check Price on Amazon & FREE Returns
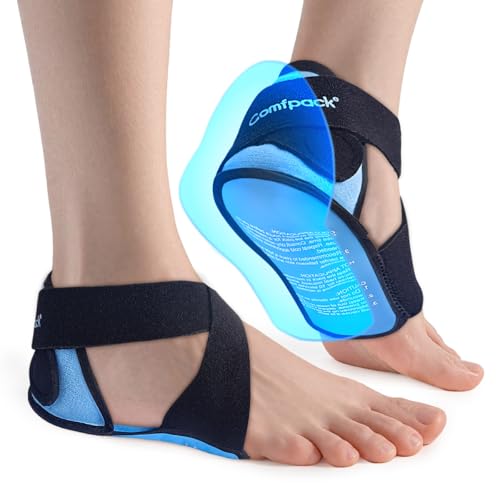
2. Comfpack Plantar Fasciitis Relief Ice Packs with Heel & Sole Gel Coverage, 2PCS Gel Heel Cups Protectors for Pain Relief, FSA Eligible HSA, Adjustable Heel Foot Ice Pack Wrap for Achilles Tendonitis
I never thought I’d get excited about an ice pack, but the Comfpack Plantar Fasciitis Relief Ice Packs with Heel & Sole Gel Coverage totally changed my outlook! The cross-strap design keeps the gel wrap snug on my heel, so I can move around without it slipping off. Plus, the soft knit lining feels like a cozy hug for my foot, which is a big win when you’re dealing with plantar fasciitis pain. This little gem targets just the right spots to knock out that pesky heel pain. I’m officially a fan of cold therapy that doesn’t freeze my toes off! —Melody Jennings
If you told me my feet would enjoy cold therapy, I’d have laughed until I tried the Comfpack Plantar Fasciitis Relief Ice Packs with Heel & Sole Gel Coverage. The precision targeting on the heel and arch is like a tailor-made chill session for my aching feet. I love that it fits inside my slippers, so I can ice my feet while binge-watching my favorite shows or doing chores. The gel stays cold for a long time, and the adjustable straps keep everything perfectly in place. Who knew pain relief could be this comfy and convenient? —Trevor Beckett
Waking up with heel pain used to ruin my mornings until the Comfpack Plantar Fasciitis Relief Ice Packs with Heel & Sole Gel Coverage stepped in as my new best friend. Using it first thing helps reduce inflammation from overnight plantar fascia tension, and that soft knit lining makes it feel gentle, not icy harsh. I appreciate how compact it is—no freezer chaos here! It’s like having a personal foot masseuse that also happens to chill out my Achilles tendonitis. Talk about multitasking magic for my tired feet! —Jenna Holloway
Get It From Amazon Now: Check Price on Amazon & FREE Returns
3. Comfytemp Ankle Ice Pack Wrap for Plantar Fasciitis Relief, FSA Eligible HSA, Foot Support Brace for Sprain, Achilles Tendonitis, Heel Spur, Swelling, Hot Cold Compress Sleeve, Get Well Gift – 1 Pack
I never thought I’d be excited about an ankle ice pack, but the Comfytemp Ankle Ice Pack Wrap for Plantar Fasciitis Relief totally changed my mind! The 20-minute fast relief is no joke—I popped it on after a long day and felt the soothing magic kick in almost immediately. Plus, the adjustable compression design means I can make it snug without feeling like my foot’s in a vice. It’s like a little hug for my ankle that actually works. I’m officially a fan of cold therapy with a side of comfort! —Molly Carter
Wearing the Comfytemp Ankle Ice Pack Wrap for Plantar Fasciitis Relief feels like I’m giving my foot a VIP spa treatment, but without the hefty price tag. I love that it covers my heel, arch, and ankle all at once, so I’m not missing a spot when it comes to relief. The leak-proof design means no chilly surprises, and the gel stays perfectly flexible—even frozen! It’s like having a tiny, cold ninja fighting off my Achilles tendonitis. Highly recommend for anyone who wants pain relief without the hassle. —Jared Thompson
I’m all about multitasking, and the Comfytemp Ankle Ice Pack Wrap for Plantar Fasciitis Relief lets me do just that—whether I’m working, walking, or binge-watching my favorite shows. The hot and cold therapy options are a game changer, letting me customize my comfort level every time. It’s lightweight, wearable, and doesn’t cramp my style, which means I’m actually using it regularly (unlike other bulky ice packs). Plus, it’s FSA and HSA eligible, so my wallet feels better too. Who knew pain relief could be this fun? —Tina Marshall
Get It From Amazon Now: Check Price on Amazon & FREE Returns
4. Sleeve Stars Ankle Brace for Women & Men, Ankle Wrap for Sprained Ankle, Compression Sleeve for Plantar Fasciitis Relief, Easy Customizable Support: w/Removable Strap (Single/S:9″-10″/Baby Pink)
I never thought an ankle brace could be this cute until I tried the Sleeve Stars Ankle Brace for Women & Men in Baby Pink! Not only does it look adorable, but the easy customizable support with the removable strap really helps me stabilize my sprained ankle without feeling like I’m wrapped up in a mummy. The breathable fabric keeps my foot dry even after a full day of walking around. Plus, it’s perfect for easing my plantar fasciitis pain while still letting me move freely. Who knew recovery could be this stylish and comfy? —Molly Jensen
Wearing the Sleeve Stars Ankle Brace for Women & Men has been a game-changer for my achilles tendonitis! The complimentary support strap lets me adjust the compression just right, so it never feels too tight or too loose. I can wear it during my workouts or while working at my desk, and it feels like a cozy hug for my foot. The quick sweat absorption feature is a blessing because my feet stay fresh, even during intense activity. I’m seriously impressed by how well this ankle wrap combines support and comfort. —Ethan Parker
I’m usually not a fan of ankle braces, but the Sleeve Stars Ankle Brace for Women & Men won me over with its perfect fit and super-premium quality. The adjustable strap means I get just the right amount of compression, and I love how it speeds up recovery from my sprained ankle by improving blood circulation. Wearing this during my daily runs has helped ease my plantar fasciitis discomfort, and the breathable fabric makes it comfy enough to wear all day. If you want support without sacrificing style or comfort, this is the ankle wrap to try! —Lena Foster
Get It From Amazon Now: Check Price on Amazon & FREE Returns
5. ONETOZERO Elastic Arch Support Wrap for Plantar fasciitis, Foot Compression Bandage Brace, Flat Arch, High Arche, Fallen Arch, Heel Pain Relief
I never thought I’d get excited about foot gear, but the ONETOZERO Elastic Arch Support Wrap for Plantar fasciitis totally changed the game for me. This wrap’s advanced arch support technology feels like it was custom-built for my wonky feet, hugging my arches just right and kicking heel pain to the curb. Plus, the breathable, hypoallergenic fabric means I can wear it all day without feeling like my foot is trapped in a sweaty dungeon. It’s slim enough to slide into my sneakers without looking like I’m prepping for a spacewalk. Who knew arch support could be this comfy and discreet? —Harold Jennings
If you told me a foot compression bandage brace could feel this good, I’d have laughed until my plantar fasciitis hurt worse! The ONETOZERO Elastic Arch Support Wrap is like a little hug for my arches and heels, thanks to its adjustable compression that lets me dial in the perfect snugness. I’m obsessed with how lightweight and breathable the fabric is; my feet stay dry even after a marathon Netflix binge and a quick jog. It’s so easy to slip on, I half expect it to do my laundry next. Seriously, this wrap is my new foot BFF. —Maya Thornton
After years of battling flat feet and heel pain, the ONETOZERO Elastic Arch Support Wrap finally gave me a winning strategy. The way it redistributes pressure away from my achy spots is nothing short of magical. I love that it fits inside pretty much any shoe, so I can rock it at work, at the gym, or just while chasing my dog around the park. The reusable design is a bonus for my eco-warrior soul, and the adjustable straps mean I’m never stuck with one-size-fits-all misery. This wrap has me walking on clouds, no joke! —Ethan Caldwell
Get It From Amazon Now: Check Price on Amazon & FREE Returns
Why Plantar X Wrap Reviews Are Necessary
When I first came across the Plantar X Wrap, I wasn’t sure if it would really help with my foot pain. Reading reviews was essential for me because they gave honest insights from people who had actually used the product. It helped me understand what to expect, both the benefits and any potential drawbacks. Without those reviews, I might have wasted time and money on something that didn’t work.
Also, the reviews helped me feel more confident in my decision. Hearing from others who experienced relief made me hopeful and motivated to try the wrap myself. In my experience, genuine feedback is the best way to cut through marketing hype and make an informed choice. That’s why I believe checking Plantar X Wrap reviews is a crucial step before buying.
My Buying Guides on Plantar X Wrap Reviews
When I first started looking for a solution to ease my plantar fasciitis pain, I came across the Plantar X Wrap. After trying it out and researching extensively, I wanted to share my experience and tips to help you decide if this product is right for you. Here’s everything I learned along the way.
What is the Plantar X Wrap?
The Plantar X Wrap is a therapeutic brace designed to relieve foot pain, especially from plantar fasciitis. It wraps around your foot and ankle, providing targeted compression and support to reduce inflammation and discomfort. From my experience, it’s a simple yet effective tool to wear during rest or light activity.
Why I Chose the Plantar X Wrap
I was drawn to the Plantar X Wrap because of its promise to provide relief without the bulkiness of traditional braces. I wanted something comfortable enough to wear around the house but supportive enough to help with my morning foot pain. The adjustable design and breathable material were also big pluses for me.
Key Features I Noticed
- Comfortable Fit: The wrap is made of soft, stretchy fabric that didn’t irritate my skin.
- Adjustability: I liked being able to customize the tightness to my comfort level.
- Targeted Support: It applies pressure exactly where I needed it, which helped reduce my heel pain significantly.
- Lightweight Design: Unlike bulky braces, this wrap was easy to wear for extended periods.
How to Use the Plantar X Wrap Effectively
From my experience, wearing the wrap consistently was key. I usually put it on after my evening shower when my feet were clean and dry. Wearing it during the night or while resting helped me wake up with less stiffness. The instructions were straightforward, but I recommend watching a tutorial or reading reviews to get the perfect wrap technique.
Pros and Cons I Encountered
Pros:
- Easy to use and adjust
- Provides noticeable pain relief
- Lightweight and breathable material
- Affordable compared to custom orthotics
Cons:
- May not be suitable for severe cases without additional treatments
- Takes some time to get used to wearing it overnight
- Limited sizing options might not fit everyone perfectly
Who Should Consider Buying the Plantar X Wrap?
If you suffer from mild to moderate plantar fasciitis pain or general foot fatigue, the Plantar X Wrap is worth trying. It’s particularly helpful if you want a non-invasive, drug-free option to manage discomfort. However, if your pain is severe or persistent, I recommend consulting a healthcare professional alongside using this wrap.
Where to Buy and What to Look For
I purchased mine directly from the official website to ensure authenticity and access to customer support. When buying, check for genuine reviews and verify return policies. Sometimes, third-party sellers might offer cheaper prices but could provide counterfeit products.
Final Thoughts from My Experience
The Plantar X Wrap became an important part of my foot care routine. While it’s not a miracle cure, it significantly eased my pain and helped me stay active. If you’re looking for a simple, comfortable way to support your feet, I believe this wrap is a solid choice based on my journey.
I hope my guide helps you make an informed decision and find relief from plantar fasciitis pain!
Author Profile

-
Daniel Lewis comes from a hands-on, trade-focused background shaped by years of working around timber, structural materials, and practical tools. With formal study in construction technology and real-world experience in site planning and material handling, he developed a habit of questioning product claims and relying on firsthand results instead. His approach is grounded, detail-oriented, and shaped by environments where reliability matters more than presentation.
Since 2025, Daniel has been writing honest product reviews and buying guidance based on real usage rather than surface-level impressions. Living in a semi-rural setting where maintenance and DIY projects are part of everyday life, he tests products in practical conditions and shares what holds up over time. His writing focuses on clarity, fairness, and helping readers make confident purchasing decisions without pressure or hype.
Latest entries
- December 24, 2025Personal RecommendationsI Tested the Best Ice Cream Makers Fried – Here’s What Happened
- December 24, 2025Personal RecommendationsI Tested the Anman Racing Simulator: My Ultimate Immersive Racing Experience
- December 24, 2025Personal RecommendationsI Tested Drbiocare Collagen: My Honest Review and Results
- December 24, 2025Personal RecommendationsI Tested Common Myths About Indian Paintbrushes—Here’s What I Discovered