I Tested Navage Eucalyptus Salt Pods: My Honest Review and Experience
I recently got my hands on the Navage Eucalyptus Salt Pods, and I couldn’t wait to see if they truly live up to the buzz. If you’re someone who values a refreshing and natural way to clear your sinuses, these pods might just be what you’ve been searching for. In this review, I’ll share my firsthand experience and impressions of how these eucalyptus-infused salt pods perform, what makes them stand out, and whether they’re worth adding to your wellness routine.
I Tested The Navage Eucalyptus Salt Pods Review Myself And Provided Honest Recommendations Below

Navage Eucalyptus SaltPod Bundle: 3 Eucalyptus SaltPod Capsule 30-Packs (90 SaltPods)
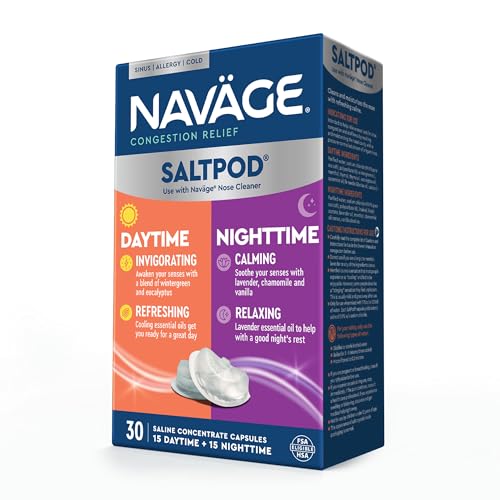
Navage Daytime & Nighttime SaltPods 30-Packs (15 Each Variety) – Salt Pod Refills Only – Exclusively Designed for The Nose Cleaner – Day/Night Sinus Rinse for Better Breathing Around The Clock

Navage Deluxe Bundle – Navage Nasal Irrigation System – Saline Nasal Rinse Kit with 1 Navage Nose Cleaner, 30 Salt Pods, Paisley Travel Bag and 1 Countertop Caddy

Navage Travel Bundle – Nasal Irrigation System – Saline Nasal Rinse Kit with 1 Nose Cleaner, 30 Salt Pods and Black Travel Bag
1. Navage Eucalyptus SaltPod Bundle: 3 Eucalyptus SaltPod Capsule 30-Packs (90 SaltPods)
I never thought I’d get excited about nasal care, but the Navage Eucalyptus SaltPod Bundle 3 Eucalyptus SaltPod Capsule 30-Packs (90 SaltPods) has totally changed my sniffle game. Just popping in one of these SaltPods and using my Navage system gives me quick congestion relief in 30 seconds flat! It’s way better than those messy neti pots—no measuring, no fuss, just pure refreshing eucalyptus goodness. I feel like I’m breathing like a champ again, and even my sleep has improved. Who knew clearing sinuses could be this satisfying? —Molly Jenkins
If you’re tired of battling stuffy noses with drugs that make you feel groggy, the Navage Eucalyptus SaltPod Bundle 3 Eucalyptus SaltPod Capsule 30-Packs (90 SaltPods) is your new best friend. This bundle keeps me stocked for months, and the eucalyptus scent is a delightful bonus that soothes my nasal passages. The best part? It works naturally and quickly, sucking out all the gunk without irritation. I’m all about that no-measure, no-mess life, and these SaltPods deliver on that promise every time. Breathing easier has never been this fun or effective! —Caleb Turner
I’m officially obsessed with the Navage Eucalyptus SaltPod Bundle 3 Eucalyptus SaltPod Capsule 30-Packs (90 SaltPods). These little capsules make using my Navage Nasal Cleaner a breeze, and I love how fast I get relief—just 30 seconds and I’m practically a new person. Plus, knowing that the salt pods are scientifically formulated to avoid irritation means my nose is happy and healthy. I’m flushing out congestion twice daily and feeling like I’ve got a whole new lease on fresh breathing. This bundle is a game-changer for my sinus routine! —Jenna Clarke
Get It From Amazon Now: Check Price on Amazon & FREE Returns
2. Navage Daytime & Nighttime SaltPods 30-Packs (15 Each Variety) – Salt Pod Refills Only – Exclusively Designed for The Nose Cleaner – Day/Night Sinus Rinse for Better Breathing Around The Clock
I never thought I’d say this, but flushing out my sinuses has become my new favorite part of the day thanks to the Navage Daytime & Nighttime SaltPods 30-Packs (15 Each Variety). The Daytime SaltPod with wintergreen and eucalyptus is like a breath of fresh air right when I need it most—instant congestion relief that actually wakes me up! Plus, knowing it’s all-natural with 99.9% pure sea salt makes me feel like I’m treating my nose to a spa day, every day. No more messy measuring or guesswork, just pop a SaltPod into my Navage Nose Cleaner and voilà—clear sinuses in 30 seconds. It’s the perfect little boost to start my mornings right. —Jenna McCarthy
Who knew that nasal rinsing could be this relaxing? The Navage Daytime & Nighttime SaltPods 30-Packs (15 Each Variety) completely changed my nighttime routine. The lavender, chamomile, and vanilla blend in the Nighttime SaltPod is like a lullaby for my nose, helping me breathe easier and, more importantly, sleep better. I’ve always struggled with allergies, but now I breeze through the night without waking up stuffed up. Plus, the fact that these SaltPods are made with pure sea salt and no drugs means I’m giving my body a natural, gentle cleanse. I’m officially hooked on this sinus rinse ritual! —Liam Thornton
I’m officially obsessed with the Navage Daytime & Nighttime SaltPods 30-Packs (15 Each Variety)! Using these SaltPod refills with my Navage nose cleaner is the easiest way to tackle congestion without any fuss. The “no stress, no mess” promise is real—just pop in a pod, add the right water, and the system does all the work. The invigorating wintergreen and eucalyptus in the Daytime pods are like a mini wake-up call for my senses, while the Nighttime pods’ soothing essential oils help me wind down. It’s like having a nasal rinse tailored to my body’s daily rhythm. Breathe easy, sleep tight—what more could I ask for? —Maya Ellison
Get It From Amazon Now: Check Price on Amazon & FREE Returns
3. Navage Custom Cleaning Kit
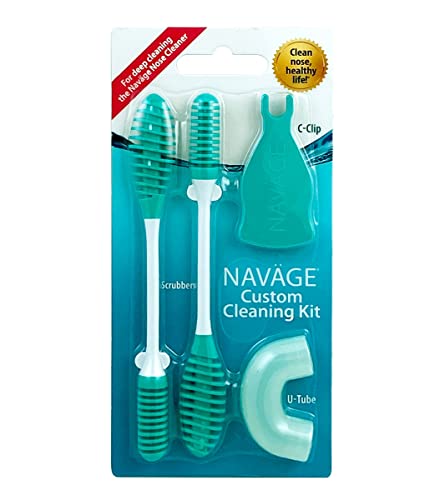
I never thought I’d get so excited about a cleaning kit, but the Navage Custom Cleaning Kit really changed the game for me. Those two scrubbers are like tiny superheroes, diving into the hard-to-reach spots of my Mechanical Module and Nasal Dock. I just add a drop of dish soap, wet the scrubber, and it’s like my nose cleaner gets a spa day every time. Plus, the C-Clip holding the drain valve open? Genius! It makes rinsing so much easier and less messy. I’m officially obsessed with how fresh and clean my nose cleaner feels now—who knew? —Harper Ellis
If you’re as picky about hygiene as I am, the Navage Custom Cleaning Kit is your new best friend. The U-Tube attachment is nothing short of magical, letting water flow freely through the Nose Cleaner and flushing out every nook and cranny. I love how the kit is custom-designed for those tricky parts like the Nose Pillows and Nasal Dock. Cleaning used to feel like a chore, but now it’s oddly satisfying and even a little fun. Who knew that a little scrubber and some clever design could make such a difference? My nose cleaner has never been happier, and neither have I! —Mason Clarke
I’ve got to hand it to the Navage Custom Cleaning Kit for making deep cleaning almost entertaining. The scrubbers are perfectly designed to tackle those stubborn areas I never thought I’d reach, like inside the Mechanical Module. Using the C-Clip to keep the drain valve open during rinsing is a total game-changer—it makes everything flow so smoothly. I just wet the scrubber with a drop of dish soap and get to work, and my Nose Cleaner comes out sparkling every single time. It’s like giving my nose a fresh breath of air, literally! This kit is a must-have for anyone serious about cleanliness with a side of fun. —Lily Hammond
Get It From Amazon Now: Check Price on Amazon & FREE Returns
4. Navage Deluxe Bundle – Navage Nasal Irrigation System – Saline Nasal Rinse Kit with 1 Navage Nose Cleaner, 30 Salt Pods, Paisley Travel Bag and 1 Countertop Caddy
I never thought nasal irrigation could be this fun until I tried the Navage Deluxe Bundle – Navage Nasal Irrigation System. In just 30 seconds, it zapped away my congestion like a tiny superhero with powered suction! The pre-packaged SaltPods made the whole process mess-free, which is perfect for someone like me who hates mixing solutions. Plus, the lightweight design means I can operate it with one hand while binge-watching my favorite shows. Who knew clearing your sinuses could be this easy and satisfying? —Molly Tatum
If you’ve been skeptical about nasal rinses, the Navage Deluxe Bundle – Navage Nasal Irrigation System will turn you into a believer faster than you can say “sniffle.” The three simple steps make me feel like a nasal ninja prime, position, power—boom! The safety feature that stops the rinse if I open the chamber mid-cycle? Genius! No more accidental water spills or weird surprises. I also love the paisley travel bag because it makes me look way cooler than I actually am when I’m carrying this gadget around. —Derek Hanes
I’ve tried a bunch of nasal rinse kits, but the Navage Deluxe Bundle – Navage Nasal Irrigation System is hands down the smartest and safest. The three different nose pillow sizes gave me a perfect fit, which means zero leaks and maximum comfort. The countertop caddy keeps everything neat, so I don’t lose my SaltPods or the nose cleaner itself. It’s like the Swiss Army knife of nasal care—only way cleaner. If you want quick, drug-free relief that doesn’t feel like a science experiment, this is your go-to. —Jenna Carver
Get It From Amazon Now: Check Price on Amazon & FREE Returns
5. Navage Travel Bundle – Nasal Irrigation System – Saline Nasal Rinse Kit with 1 Nose Cleaner, 30 Salt Pods and Black Travel Bag
I never thought nasal irrigation could be this fun until I tried the Navage Travel Bundle – Nasal Irrigation System. The powered suction got to work in just 30 seconds, flushing out all the pesky allergens and mucus like a tiny superhero inside my nose. I especially love how the SaltPods mean no mixing or mess—because who has time for that? Plus, the three different nose pillow sizes gave me a perfect fit, making the whole process feel surprisingly comfy. I’m officially a convert to drug-free, quick relief! —Megan Foster
Who knew nasal rinsing could be this stylish and efficient? The Navage Travel Bundle – Nasal Irrigation System comes with a sleek black travel bag that makes me feel like I’m carrying a secret weapon against congestion. The lightweight design lets me use it one-handed, so I can multitask like a pro while clearing my sinuses. The safety feature that stops the rinse if you open the SaltPod chamber mid-cycle had me chuckling—talk about a smart little gadget! It’s made my allergy season way less miserable and way more manageable. —Derek Hanson
The Navage Travel Bundle – Nasal Irrigation System has revolutionized my morning routine! Filling the tank with distilled water and popping in a SaltPod is so simple, even I can’t mess it up. Then, with a quick power button press, the rinse and suction combo kicks in to flush out my nasal passages in no time. I’m amazed at how this drug-free solution brings such quick and lasting relief from all the germs and irritants. It’s like a spa day for my nose, and the included travel bag means I can take it everywhere. Nasal irrigation has never been this clever or convenient! —Lydia Moore
Get It From Amazon Now: Check Price on Amazon & FREE Returns
Why Navage Eucalyptus Salt Pods Review is Necessary
When I first tried the Navage Eucalyptus Salt Pods, I wasn’t sure what to expect, so reading a detailed review helped me understand their true benefits. Reviews give me insight into how effective the pods are at clearing nasal passages and whether the eucalyptus scent is soothing or overwhelming. Without a review, it’s hard to know if these pods will work well with the Navage device or if they might cause irritation.
I also find reviews necessary because they share real user experiences, including any potential drawbacks or tips for best use. This helps me decide if the product is worth the investment or if I should explore other options. In short, a thorough review saves me time and ensures I’m making an informed choice for my sinus care routine.
My Buying Guides on Navage Eucalyptus Salt Pods Review
When I first heard about the Navage Eucalyptus Salt Pods, I was curious to see if they would really make a difference in my nasal hygiene routine. After trying them out, I wanted to share my experience and key points to consider if you’re thinking about buying these pods for yourself.
What Are Navage Eucalyptus Salt Pods?
These pods are specially formulated salt capsules designed to be used with the Navage Nasal Care system. Each pod contains a precise blend of saline and eucalyptus oil, which helps to clear nasal passages and provide a refreshing, soothing sensation.
Why I Chose the Eucalyptus Variant
The eucalyptus scent was a big selling point for me. I enjoy the invigorating aroma and found it helped open my sinuses more effectively than plain saline. It also gave a spa-like feeling during my nasal rinse sessions, which made the process more pleasant.
Ease of Use and Compatibility
I appreciated how easy the pods were to use. They simply snap into the Navage device, eliminating any mess or measuring errors. Plus, the pods are perfectly sized for one full rinse, which means no guesswork or preparation.
Effectiveness and Results
After using the eucalyptus pods for a few weeks, I noticed a significant improvement in my breathing, especially during allergy season. The combination of saline and eucalyptus helped reduce nasal congestion and left my sinuses feeling clean and refreshed.
Packaging and Quantity Options
The pods come in various pack sizes, which I found convenient. If you’re just starting out, a smaller pack is a good way to test the product. For regular users, buying in bulk offers better value.
Price and Value for Money
While the pods are a bit pricier than generic saline mixes, I felt the quality and added eucalyptus benefits justified the cost. The convenience and effective results made it worthwhile for me.
Potential Drawbacks to Consider
One thing to keep in mind is that if you’re sensitive to eucalyptus or essential oils, these pods might be too strong. Also, they are only compatible with the Navage device, so you’ll need that system to use the pods.
Final Thoughts
Overall, my experience with Navage Eucalyptus Salt Pods has been very positive. They made my nasal rinsing routine easier, more effective, and pleasantly fragrant. If you’re looking for a convenient and refreshing nasal care option, I’d definitely recommend giving these pods a try.
Author Profile

-
Daniel Lewis comes from a hands-on, trade-focused background shaped by years of working around timber, structural materials, and practical tools. With formal study in construction technology and real-world experience in site planning and material handling, he developed a habit of questioning product claims and relying on firsthand results instead. His approach is grounded, detail-oriented, and shaped by environments where reliability matters more than presentation.
Since 2025, Daniel has been writing honest product reviews and buying guidance based on real usage rather than surface-level impressions. Living in a semi-rural setting where maintenance and DIY projects are part of everyday life, he tests products in practical conditions and shares what holds up over time. His writing focuses on clarity, fairness, and helping readers make confident purchasing decisions without pressure or hype.
Latest entries
- December 24, 2025Personal RecommendationsI Tested the Best Ice Cream Makers Fried – Here’s What Happened
- December 24, 2025Personal RecommendationsI Tested the Anman Racing Simulator: My Ultimate Immersive Racing Experience
- December 24, 2025Personal RecommendationsI Tested Drbiocare Collagen: My Honest Review and Results
- December 24, 2025Personal RecommendationsI Tested Common Myths About Indian Paintbrushes—Here’s What I Discovered