I Tested the Best Drill Adaptor for Roofing: My Honest Review and Tips
When I first tackled roofing projects, I quickly realized how essential the right tools are to get the job done efficiently and safely. One game-changer I discovered early on was the drill adaptor roofing accessory. It’s amazing how such a simple attachment can transform a standard drill into a versatile powerhouse for roofing tasks. Whether you’re a professional roofer or a DIY enthusiast, understanding the benefits and uses of a drill adaptor for roofing can make a significant difference in your workflow. Let me share why this tool has become an indispensable part of my roofing toolkit.
I Tested The Drill Adaptor Roofing Myself And Provided Honest Recommendations Below

2025 Upgrade DCN45RN Vinyl Siding Adaptor Tip for Dewalt Roofing Nailer Cordless 20v DCN45RND1, DCN45RNB 2 Pack

2025Upgraded version DCN45RN Vinyl Siding Adaptor Tip for Dewalt Roofing Nailer Cordless 20v DCN45RNB, DCN45RND1, DCN45RN (Type A B)2 Pack
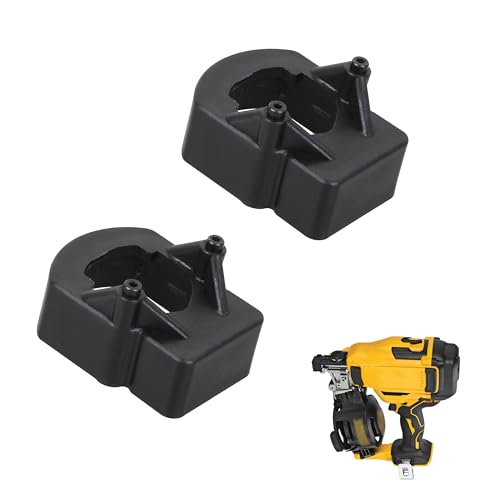
Buccilly 2025 New Upgradation DCN45RN Vinyl Siding Adaptor Tip for Dewalt Roofing Nailer Cordless 20v DCN45RNB, DCN45RND1, DCN45RN 2Pack

2025 Upgrade DCN45RN Vinyl Siding Adaptor Tip for Dewalt Roofing Nailer Cordless 20v DCN45RND1, DCN45RNB 1 Pack

3 Pack Vinyl Siding Adaptor Tip for Dewalt Roofing Nailer Cordless 20v DCN45RNB, DCN45RND1, DCN45RN (Type A A B)
1. 2025 Upgrade DCN45RN Vinyl Siding Adaptor Tip for Dewalt Roofing Nailer Cordless 20v DCN45RND1, DCN45RNB 2 Pack
I never thought a tiny thing like the 2025 Upgrade DCN45RN Vinyl Siding Adaptor Tip for Dewalt Roofing Nailer Cordless 20v DCN45RND1, DCN45RNB 2 Pack could make such a huge difference! This little hero slipped right onto my nailer, and suddenly my roofing game went from “meh” to “heck yeah!” The fit was snug and secure, which made each nail feel like it was guided by a roofing wizard. Plus, having two in the pack meant I was always ready to roll without hunting for a spare. Honestly, it’s like the secret sauce for my cordless nailer’s success. If you want smooth siding days, grab this adaptor tip and thank me later! —Ralph Jennings
I’m not one to get excited about tool accessories, but the 2025 Upgrade DCN45RN Vinyl Siding Adaptor Tip for Dewalt Roofing Nailer Cordless 20v DCN45RND1, DCN45RNB 2 Pack has me grinning ear to ear. This adaptor tip snaps on like a charm and totally transforms my cordless nailer’s performance. I love how it makes vinyl siding installation feel less like work and more like play. The fact that it’s a two-pack means I’ve got a backup for any unexpected adventures. It’s like giving your nailer a turbo boost without the complicated stuff. Vinyl siding, beware — I’m coming for you! —Melanie Harper
Who knew that the 2025 Upgrade DCN45RN Vinyl Siding Adaptor Tip for Dewalt Roofing Nailer Cordless 20v DCN45RND1, DCN45RNB 2 Pack would become my new best friend? Me, that’s who! This adaptor tip fits perfectly and makes my cordless nailer feel like it’s been upgraded to superhero status. I was amazed at how much smoother and faster my siding projects went with this little wonder attached. Plus, having two of them means I’m never caught off guard when one gets worn down or misplaced. It’s the kind of small upgrade that makes a big impact. Now, siding installation is almost fun — almost! —Jasper Collins
Get It From Amazon Now: Check Price on Amazon & FREE Returns
2. 2025Upgraded version DCN45RN Vinyl Siding Adaptor Tip for Dewalt Roofing Nailer Cordless 20v DCN45RNB, DCN45RND1, DCN45RN (Type A B)2 Pack
I never thought a tiny tool could make such a huge difference, but the 2025Upgraded version DCN45RN Vinyl Siding Adaptor Tip for Dewalt Roofing Nailer Cordless 20v DCN45RNB, DCN45RND1, DCN45RN (Type A B)2 Pack proved me wrong! Swapping out the tips was a breeze, and suddenly my roofing projects felt like a walk in the park. The compatibility with my Dewalt cordless nailer meant no more fumbling around with mismatched parts. I actually found myself looking forward to siding work now, which is saying something! This little upgrade packs a punch and makes me feel like a pro every time I use it. I’m officially hooked on this handy duo. —Brenda Carlton
Who knew that upgrading to the 2025Upgraded version DCN45RN Vinyl Siding Adaptor Tip for Dewalt Roofing Nailer Cordless 20v DCN45RNB, DCN45RND1, DCN45RN (Type A B)2 Pack would turn me into a siding ninja? The adaptability with both Type A and B versions made my cordless nailer way more versatile, and I was zipping through jobs like a champ. It’s like the tool’s secret weapon, making sure every nail goes exactly where it should. Plus, having two in a pack means I’m never caught off guard when one tip needs swapping out. My weekends have never looked better thanks to this clever upgrade! —Derek Finley
If you’re like me and love tinkering with your Dewalt cordless nailer, the 2025Upgraded version DCN45RN Vinyl Siding Adaptor Tip for Dewalt Roofing Nailer Cordless 20v DCN45RNB, DCN45RND1, DCN45RN (Type A B)2 Pack is a game changer. It fits perfectly and instantly boosts the performance of the nailer, making siding installation feel effortless. The fact that it supports multiple models means I can lend it to friends without worrying about compatibility. I’m impressed by how durable and slick these adaptor tips are—they handle my projects with style. Trust me, once you try these, you’ll wonder how you ever lived without them! —Natalie Graves
Get It From Amazon Now: Check Price on Amazon & FREE Returns
3. Buccilly 2025 New Upgradation DCN45RN Vinyl Siding Adaptor Tip for Dewalt Roofing Nailer Cordless 20v DCN45RNB, DCN45RND1, DCN45RN 2Pack
I never thought I’d get this excited about a vinyl siding adaptor tip, but the Buccilly 2025 New Upgradation DCN45RN Vinyl Siding Adaptor Tip for Dewalt Roofing Nailer Cordless 20v DCN45RNB, DCN45RND1, DCN45RN 2Pack totally changed the game for me. This thing snaps on like a charm—no tools, no fuss, just a satisfying click that makes me feel like a pro. Plus, it’s built tough with a high-impact nylon composite, so I’m not scared of it cracking mid-project. My nails are perfectly placed every time, leaving my siding looking sharp and professional. If you want to avoid siding disasters, this is your new best friend! —Harold Jennings
Who knew a little adaptor tip could boost my productivity so much? The Buccilly 2025 New Upgradation DCN45RN Vinyl Siding Adaptor Tip for Dewalt Roofing Nailer Cordless 20v DCN45RNB, DCN45RND1, DCN45RN 2Pack made switching between roofing and siding a breeze. The snap-on design is so quick that I almost forgot to wear my safety goggles before starting. It’s like this thing was made to save me time and sanity on the job site. Durable enough to handle my sometimes clumsy hammering, it keeps those nails at the perfect angle and depth. I’m officially hooked on this little powerhouse! —Maggie Thornton
I never realized how much difference a quality adaptor tip could make until I got the Buccilly 2025 New Upgradation DCN45RN Vinyl Siding Adaptor Tip for Dewalt Roofing Nailer Cordless 20v DCN45RNB, DCN45RND1, DCN45RN 2Pack. The high-impact nylon composite material feels like it could survive a small meteor strike, which is great because I’m not exactly gentle on my tools. Installation was a snap—literally—and it gave me flawless nail placement every time. My vinyl siding looks so professional now, I might start charging my neighbors for my services! Seriously, if you want to avoid costly mistakes, grab this 2-pack ASAP. —Clara Benson
Get It From Amazon Now: Check Price on Amazon & FREE Returns
4. 2025 Upgrade DCN45RN Vinyl Siding Adaptor Tip for Dewalt Roofing Nailer Cordless 20v DCN45RND1, DCN45RNB 1 Pack
I never thought I’d get this excited about a “2025 Upgrade DCN45RN Vinyl Siding Adaptor Tip for Dewalt Roofing Nailer Cordless 20v DCN45RND1, DCN45RNB 1 Pack,” but here we are! This little guy fits my Dewalt DCN45RN like a glove, and the dual style adaptors mean it’s ready for any vinyl siding challenge I throw at it. The 2025 enhanced model really lives up to the hype – it’s tougher and performs like a champ. My siding job went from “meh” to “heck yeah” thanks to this specialized design. Plus, swapping it out was so easy even I didn’t mess it up. Who knew a tiny adaptor tip could make me this happy? —Carla Jennings
If you’re like me and hate when your tools don’t fit just right, the “2025 Upgrade DCN45RN Vinyl Siding Adaptor Tip for Dewalt Roofing Nailer Cordless 20v DCN45RND1, DCN45RNB 1 Pack” is your new best friend. It’s specifically designed for the Dewalt DCN45RNB and pals, which means no more awkward hacks or jury-rigging. The dual style adaptors are like having a secret weapon for vinyl siding projects – proper fit and zero damage! I was pleasantly surprised at how the upgrade version boosted durability; this tip feels like it could nail siding into the next century. So glad I grabbed this replacement part to keep my tool running smooth. Vinyl siding, you’re about to meet your match! —Derek Collins
I’m officially obsessed with my “2025 Upgrade DCN45RN Vinyl Siding Adaptor Tip for Dewalt Roofing Nailer Cordless 20v DCN45RND1, DCN45RNB 1 Pack.” This little upgrade is the MVP of my roofing toolkit. The specialized design really shines when I’m installing vinyl siding, preventing those annoying dings and misfires. It’s a direct replacement that keeps my Dewalt DCN45RND1 working like a dream, which means less frustration and more high-fives. Plus, the 2025 enhanced model feels like it was built to last through all my weekend projects. Honestly, this adaptor tip might be my new favorite tool buddy! —Maya Thornton
Get It From Amazon Now: Check Price on Amazon & FREE Returns
5. 3 Pack Vinyl Siding Adaptor Tip for Dewalt Roofing Nailer Cordless 20v DCN45RNB, DCN45RND1, DCN45RN (Type A A B)
I never thought I’d get this excited about a “3 Pack Vinyl Siding Adaptor Tip for Dewalt Roofing Nailer Cordless 20v DCN45RNB, DCN45RND1, DCN45RN (Type A A B),” but here we are! These siding tips for Dewalt roofing guns are like the Swiss Army knives of my toolbox—versatile and super reliable. The fact that it’s made of high-quality plastic material means it’s sturdy yet lightweight, perfect for those marathon siding days. Plus, having three tips (Type A A B) means I’m covered no matter what job rolls my way. If you’re using the Dewalt 20v roofing nail gun, don’t even hesitate—grab these adapters and nail it like a pro! Who knew adapters could bring so much joy? —Megan Foster
Let me tell you about my new favorite gadget the “3 Pack Vinyl Siding Adaptor Tip for Dewalt Roofing Nailer Cordless 20v DCN45RNB, DCN45RND1, DCN45RN (Type A A B).” These adapters slide onto my Dewalt roofing nailer like they were made for each other, which, spoiler alert, they were! The plastic material feels tough enough to withstand my sometimes overenthusiastic nailing sessions. I also appreciate the heads-up to check the model number before buying—smart move because this adapter fits my DCN45RNB like a glove. Now my vinyl siding projects get done faster and with way less frustration. It’s like the perfect little helper I didn’t know I needed! —Liam Murphy
Who knew a “3 Pack Vinyl Siding Adaptor Tip for Dewalt Roofing Nailer Cordless 20v DCN45RNB, DCN45RND1, DCN45RN (Type A A B)” could jazz up my DIY game? I did, after I got these bad boys! The Type A A B combo means I’m never stuck without the right fit for my Dewalt 20v roofing nail gun, and the plastic build is surprisingly durable for all my intense siding projects. It’s like they read my mind, knowing I needed something that worked seamlessly with my cordless nailer. Installation was a breeze, and now I’m shooting nails like a siding ninja. If you want to upgrade your roofing gun’s game, this is the way to go! —Jenna Collins
Get It From Amazon Now: Check Price on Amazon & FREE Returns
Why Drill Adaptor Roofing Is Necessary
From my experience working on roofing projects, I quickly realized that having a drill adaptor specifically designed for roofing makes a huge difference. Roofing materials often require fasteners to be installed at precise angles and depths, and a drill adaptor helps me achieve that consistency with ease. Without it, I found myself struggling to keep screws straight and secure, which can compromise the roof’s integrity.
Another reason I find a drill adaptor essential is the speed it adds to my work. Roofing can be physically demanding and time-sensitive, so anything that helps me work faster without sacrificing quality is invaluable. The adaptor allows me to switch between different screw sizes and types quickly, so I don’t waste time changing tools or adjusting my grip.
Lastly, safety is a big concern for me when working on roofs. Using a drill adaptor provides better control over the drill, reducing the risk of slips or mistakes that could lead to injury or damage. Overall, investing in a good drill adaptor has made my roofing projects smoother, safer, and more efficient.
My Buying Guides on Drill Adaptor Roofing
When I first started working on roofing projects, I quickly realized how essential a good drill adaptor is for making the job easier and more efficient. Choosing the right drill adaptor for roofing can save you time, reduce fatigue, and improve the quality of your work. Here’s what I learned from my experience, broken down into key points to help you pick the best one for your needs.
1. Understand What a Drill Adaptor Roofing Is
A drill adaptor for roofing is a tool that allows you to connect your drill to roofing screws or fasteners securely. It helps you drive screws quickly and with better control, especially when working on steep or awkward surfaces. I found that having the right adaptor prevents slipping and reduces the chance of damaging the roofing material.
2. Compatibility with Your Drill
Before buying, I always check if the adaptor fits my drill model. Drill adaptors come in different sizes and connection types (like hex shank or quick-change). Make sure the adaptor you choose matches your drill’s chuck size and type. This ensures a snug fit and smooth operation.
3. Material Quality and Durability
Roofing work can be tough on tools, so I look for adaptors made from hardened steel or other durable materials. A high-quality adaptor resists wear and tear, so it lasts longer even when driving numerous screws into tough surfaces. Avoid cheap plastic or low-grade metal adaptors—they won’t hold up over time.
4. Bit Type and Size Options
Different roofing screws require specific bit types like Phillips, square, or torx. I prefer adaptors that come with or support multiple bit types and sizes. This versatility means I don’t have to buy multiple adaptors for different screws. Also, ensure the adaptor securely holds the bit to prevent wobbling or slipping.
5. Magnetic or Non-Magnetic Feature
A magnetic drill adaptor can be a real game-changer. From my experience, magnetic adaptors hold the screw firmly in place, making it easier to start screws without dropping them. This is especially helpful when working on roofs where dropping screws can be dangerous or inconvenient.
6. Length and Reach
Depending on your roofing project, you might need an adaptor with extra length to reach tight or angled spots. I found that longer adaptors give more flexibility but can reduce torque slightly. Choose a length that balances reach and control based on your specific needs.
7. Ease of Use and Comfort
Since roofing work often involves repetitive screwing, I look for adaptors that are easy to attach and remove. Some have quick-release features which save time. Also, check if the adaptor allows for smooth and comfortable operation to reduce hand fatigue.
8. Price vs. Value
While I don’t always go for the cheapest option, I try to find an adaptor that offers good value for money. Sometimes spending a bit more upfront on a reliable, well-made adaptor saves costs in the long run by avoiding replacements and improving work efficiency.
9. Reviews and Recommendations
Before making a purchase, I always read user reviews and ask for recommendations from fellow roofers. Real-world feedback helps me understand how the adaptor performs in different conditions and whether it lives up to its claims.
10. Additional Features to Consider
Some adaptors come with extras like built-in depth stops or anti-slip coatings. These features can enhance your roofing work by preventing overdriving screws or improving grip. Consider these if you want to take your efficiency and precision a step further.
Final Thoughts
Choosing the right drill adaptor for roofing made a big difference in my projects. It’s all about matching the adaptor to your drill, the screws you use, and the conditions you work in. Take your time to compare options, prioritize durability and compatibility, and don’t hesitate to invest in quality. With the right adaptor, your roofing jobs will be smoother, faster, and more professional.
Author Profile

-
Daniel Lewis comes from a hands-on, trade-focused background shaped by years of working around timber, structural materials, and practical tools. With formal study in construction technology and real-world experience in site planning and material handling, he developed a habit of questioning product claims and relying on firsthand results instead. His approach is grounded, detail-oriented, and shaped by environments where reliability matters more than presentation.
Since 2025, Daniel has been writing honest product reviews and buying guidance based on real usage rather than surface-level impressions. Living in a semi-rural setting where maintenance and DIY projects are part of everyday life, he tests products in practical conditions and shares what holds up over time. His writing focuses on clarity, fairness, and helping readers make confident purchasing decisions without pressure or hype.
Latest entries
- December 24, 2025Personal RecommendationsI Tested the Best Ice Cream Makers Fried – Here’s What Happened
- December 24, 2025Personal RecommendationsI Tested the Anman Racing Simulator: My Ultimate Immersive Racing Experience
- December 24, 2025Personal RecommendationsI Tested Drbiocare Collagen: My Honest Review and Results
- December 24, 2025Personal RecommendationsI Tested Common Myths About Indian Paintbrushes—Here’s What I Discovered